MEDIA ANNOTATION
Thinglink provides a handy means of annotating media for free, at least for the basic features. It’s especially useful because the files users create easily shared or embedded in a variety of platforms (WordPress—as seen below—Facebook, Twitter, Pinterest, Google+, Tumblr, Edmodo, Tackk, email or the Thinklink Facebook app). Beyond sharing capabilities, it also allows users to create channels, which essentially creates a ‘playlist’ of media (either image or video) that can be shared for play or educational purposes. One of the more education-oriented features is group annotation, thus facilitating group projects in which users other than the owner can collaborate on contributing annotations of various types—text, images, links and video. JJ also mentioned a small museum that incorporated the embedded files as a means of making their collection more interactive online. The site is a supremely useful on that I would strongly recommend.

Relatedly, ImageDiver (in beta testing) supports image annotation, displaying thumbnails of the section of the image users wish to annotate on the left with the full image on the right (Img 1). Upon clicking either the red rectangle or the thumbnail, users are presented with an enlarged image of the annotated section (Img 2).
Img 1

Img 2
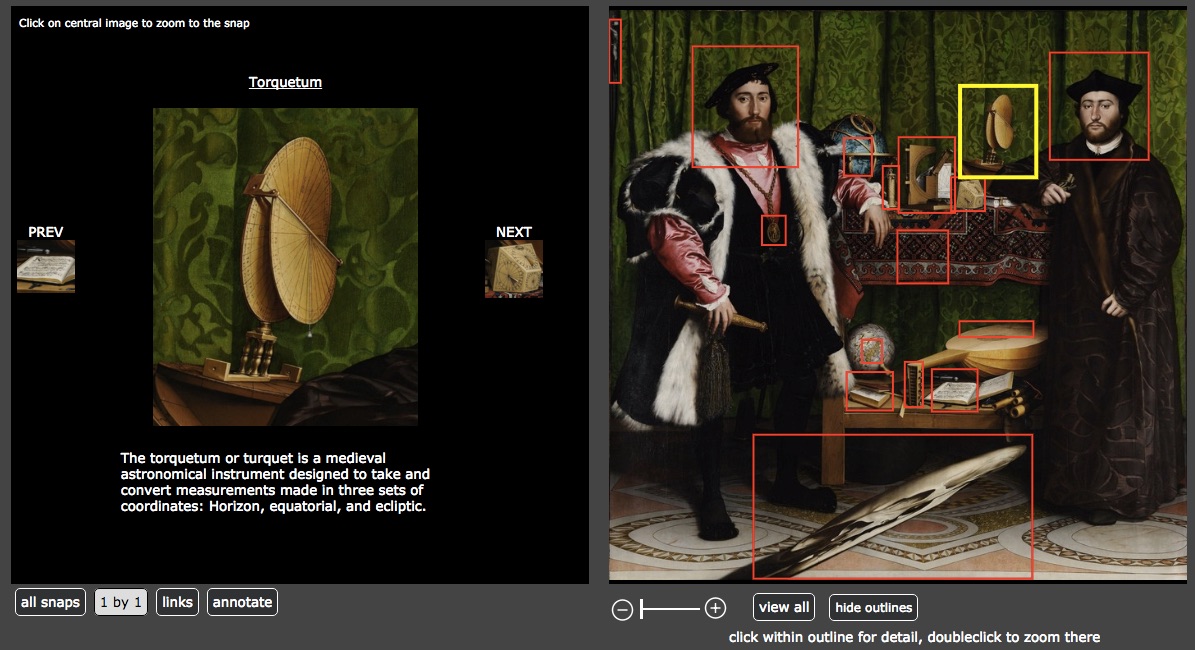
I didn’t create an account for myself, so I haven’t played with it first hand. But if you have high quality images that can bear this level of zoom, then I’d imagine that it would be a powerful teaching tool. The feature of providing all of the thumbnail annotations on the left might prove especially useful, since students could browse through them almost like flashcards.
YouTube, on the other hand, focuses on video and does allow for a certain level of customizable annotation options, as seen in my video below. The major frustration lies in that there’s no way to show the annotations off of the image. When JJ walked us through the process of annotating a YouTube video, we discovered that even clips shown in full screen (rather than widescreen) don’t allow users to place annotations on the black, empty margins on either side. A feature of YouTube that I very much appreciate, though, is that it’s easy to share and embed from YouTube. Then once users have embedded the video in another webpage (like this blog), viewers are provided with all of the same tools—volume control, replay/pause/play, settings, full screen, share, and watch later—as they would have in YouTube, but with the added bonus of an easy redirect button back to the original YouTube page from which the embed is drawn (just click the YouTube icon on the lower right of the video after pressing play and hovering your mouse over the video)
For non-classroom purposes, Animoto provides a fun way of putting together another visual presentation that could potentially incorporate annotations. The reason I don’t find it classroom-friendly lies in its means of incorporating text, since it messes with the size of the image and the text is clear and legible only in certain styles (even though the style I used was listed in Education, the text was washed out and only partially legible). At the free level of usage, I also didn’t discover any way to edit which images were presented together. The images presented alone or together in the following video are shown that way purely through coincidence. To ensure that the images that did look good together went together, I just had to play with which ones were placed next to one another in the ordering of the thumbnails and the number of images that I included. Perhaps at a paying level this tool would prove more powerful and thus useful in a teaching setting.
I also have no explanation for why there’s a giant margin below the video (it shows as a grey rectangle on my editing screen but just as giant blank space on this published page). Another disadvantage is also that, unless you upgrade your account ($$), there’s no way to remove the “Animoto Trial” banners. I’m not a huge fan, though it could prove quite useful in terms of marketing an event or a business.
Aside from these media annotation tools, we also took a look at TinEye and Google‘s reverse image search to find sources for images. TinEye worked well for 2D images while Google managed images of 3D objects along with the 2D. Google also provides images that are “visually similar.” While those similarities can be quite divergent in terms of content, Google’s algorithm picked up on some aspect of the image that might prove useful in creating a group of images or locating unexpected connections between images. TinEye I’m sure, does just as will with images of 2D objects as Google. But I’m a bit biased towards Google, since it found the original source for an image of a Coptic bound book that I’ve been seeking for months, while TinEye couldn’t locate any instances of the image.
The process for reverse searching an image in both is to drag an image to the search bar in the websites I’ve linked in the previous paragraph. Users can also upload an image manually. Unfortunately (or fortunately, depending upon need), you have to clear your image search in Google before entering a second image for reverse image searching. If you try to search a second on top of the first, Google will search for images that share the qualities of both images. Just something to remember, neither algorithm (as far as I know) deals as much with content as with characteristics of the uploaded image—light and color patterns being most notable.
ORAL HISTORIES & THEIR ANNOTATIONS
Transcriptions serve as the oral history equivalent to media annotations.
We looked primarily at the admirable work being done by Oral History Metadata Synchronizer (OHMS). While still in BETA, the synchronizer seeks to break oral history recordings down into their constituent parts, highlighting the segment that’s being recounted. The “index” for that segment can be labeled with a partial transcript, a segment synopsis, and tagged with keywords & subjects. To the left of this segment metadata is the time at which that segment begins (if input correctly by the technician). The transcript itself is also keyed with these links that jump to the beginnings of the segments (again, if keyed in properly). The process used by OHMS makes transcripts far more searchable and skimable, which will facilitate speedier research and general perusal of these oral histories.
Lynda.com uses another method of syncing an oral presentation and a transcript that likely quite manual and labor intensive (I’ve not been able to find what program they’re using). In the Information Literacy video course we’ve been watching for my Reference and Resource Selection class, the transcript highlight the section of the audio that’s being spoken at that moment. JJ’s thought was that the person syncing the transcript with the audio was likely manually highlighting the word or phrase as the audio track progressed. If that’s the case, it shares striking similarities with editing an annotation in YouTube.
]]>